Head Back Over to Wordless Wednesday
How To Make A Three Layer Diaper Cake Using Baby Blankets


For this and most of the cakes I make, I use a 40 x 40 baby blanket to achieve a bottom layer of 12 inches round. To start, lay the blanket (with the inside facing up) out in front of you leaving any decals for the last fold. Begin folding the end near you, then keep folding and smoothing out any bunches or wrinkles as you go.

Stand this layer up and make sure the height measures 5 to 5 ½ inches exactly (very important). At this time you can also measure the width, which should be around 12 inches. To do this you simply take your measure tape and measure the top of the template sideways. Adjust the length by bringing one end into (see picture below) the “ring”. This will help you by adding more or less to meet the 12 inches for bottom layer.

Once measurements are right, go ahead and pin both ends together using a corsage pin.

Now you can add your diapers by inserting them one at a time overlapping each other until you fill this layer.
Note: Always pack diapers in tightly, this will help stabilize your cake and insure its roundness. You can use packing paper in the middle instead of diapers to fill and pack tight. Make sure to push “out” to help form the diapers which helps make the template to take on fuller, rounder look.

You can use a cake plate or whatever you choose for the bottom BEFORE you start to work on the other layer.


This layer should be no higher than 5 inches (you don't want a cone appearance) and 8 inches wide. Once you have adjusted this layer like the bottom layer, pin the ends together & fill with diapers.
Note: It's always a good idea to stand up the second layer onto the bottom layer while holding ends together to get an idea of how much room you'll have on all sides (like picture above) for product, or whatever, before pinning. Repeat step one for filling the inside of layer two.

In this case you need to either take out some diapers from second
layer so the bears legs can rest there from layer three & fold one in the middle for bear to connect with.

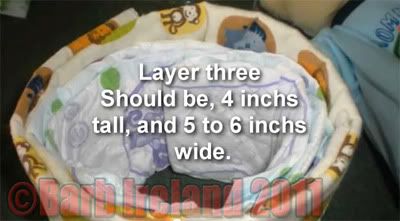
Fill about five diapers into the third layer then set in bear. You may also want to tie off the bottom of a oneise to insure a good fit, or omit all of this and just stuff the bears butt into third layer… either works. See pictures below.


So now the cake should look something like this! Adorable, if I say so myself – but for now it’s onto the shred and adding your embellishments!
So now the cake should look something like this! Adorable, if I say so myself – but for now it’s onto the shred and adding your embellishments!
Now go ahead and mix your shred if you haven't already (a good idea is to use colors that are in blankets, toys, bibs and so on)
Start adding at the top paying special attention to filling around the bear, this will help keep bear from moving and look fuller & rounder. Continue on adding shred to all layers. Shred not only gives more “wow” factor to your designs, but this also helps keep the cake stable and the layers secure within themselves. No need for dowels or any of that stuff.
This style is old school (I began making diaper cakes in 1999 but it's a favorite design because it’s one I taught myself. There were no instructions back then). Please don’t misunderstand. It’s not that the “spiral or rolled” kind are not nice; they are! These are just more compact and you can do so much more with blankets, whole baby suits, toys avoiding the issue of falling apart.
The most important factor is you just want to create and make this all fun!
Barb Ireland ©2011
Barb Ireland is the founder of Make A Diaper Cake Biz, http://www.makeadiapercake.biz. You learn how to make a diaper cake, or start your own diaper cake business at her site. Articles are free to be reprinted as long as author’s bio remains intact. Copyrights 2000/2013
******************************************
Related articles


Great Tutorial. I never thought to use baby blankets.
Hi Desiree, thanks for reading, I appreciate it!!